Silly Launch Builder Chime

I spend way too much time on a daily basis waiting for Launch libraries to build- on particularly bloated libraries, I’ve had it take up to two minutes. And, with my ADHD, I get too easily distracted during that wait time. It’s a major productivity killer.

So I figured out I can throw this code in as a Live Expression in my Chrome Console:

if (document.location.href.indexOf("data-collection/tags/") != -1 || document.location.href.indexOf("reactor-lens/tags/")!= -1) {window.launchChimer = window.launchChimer || false;if (document.querySelectorAll(".library .spectrum-CircleLoader.spectrum-CircleLoader--small").length > 0 && !window.launchChimer){window.launchChimer = true} else if (document.querySelectorAll(".library .spectrum-CircleLoader.spectrum-CircleLoader--small").length == 0 && window.launchChimer == true) {var snd = new Audio("http://soundbible.com/grab.php?id=1599&type=wav");snd.play();window.launchChimer = false}}

Like this:

And it chimes when the loading icon stops spinning.

I got the sound file from soundbible– you could replace it with whatever you want. Originally I had it pull from a sound that already exists on any mac (as found on stack overflow) but it made the script ugly and long.

If it isn’t working for you, double check which frame your Live Expression is trying to be on. For me, it automatically went to the “Main Content” frame, which is where it works best, but it sounds like for some folks, you may need to manually select it:

There are better ways to do this. I know this. If I had more hours in the day, I could even make a decent Chrome extension out of it. But this works for now, and I’ve already held on to this for months without blogging it, waiting for time to make it cooler, and it would appear that time is never going to come, so… here’s my imperfect solution.

Consider this a beta. I fully expect something about it will not work in some situation. Please let me know how it goes for you. Or if anyone wants to take it and improve upon it, I’d appreciate it!

New industry tool: Adobe Configuration Export

An industry friend and former coworker, Gene Jones, made me aware of an awesome new tool he’s created- a tool that exports your Report Suite info into an excel file. It can compare the variable settings of multiple report suites in one tab, then creates a tab with a deeper look at all the settings for each report suite.

This is similar to the very handy Observepoint SDR Builder– I’ll freely admit I’m likely to use both in the future. Both (free) tools show you your settings and allow for report suite comparison. The Observepoint SDR Builder uses a google sheet extension and has a little more set up involved (partially because if you’re an Observepoint customer you can expand its functionality) but it can allow you manage your settings directly from the google sheet (communicating those changes back to the Adobe Admin Console).

But sometimes all you want is a simple export of current settings in a simple, local view, in which case the Adobe Configuration Export tool is very straightforward and simple to use.

And, it’s open source– the community can add to it and make use of it for whatever situations they dream up. I’m excited to see what features get added in the future (I see a “Grade Your Config” option that intrigues me). Nice work, Gene!

Quick poll: What should I tackle next?

Each new year, I tend to dive into some new side project (this is how the Beacon Parser and the PocketSDR came about). I have quite a few things I want to tackle right now, and one main thing I’m slowly plugging away at, but in the meantime, I’m wondering what to prioritize. So, a poll:

Any other ideas (or desired improvements to existing tools)? Let me know in the comments.

New tool: PocketSDR Mobile App for Adobe Analytics

I mentioned in my previous post that one of the reason I’m going “independent” is to have more time to work on products and pet projects. One of those ongoing projects of mine has been a mobile app you can use to keep your Adobe Analytics SDR/Variable Map easily accessible on your phone.
   
Get it on Google Play
The first release of this actually went out in August 2016, but I didn’t let anyone know because I felt it was still too “beta” and I wanted to clean it up before making it more publicly known. A year and a half later (and various framework upgrades that required redoing the whole thing… each time learning and applying those learnings), I got it to a point where I don’t feel ashamed to share it, though of course there is always room for more improvement.

To use the app, you will need your Adobe Analytics Web Services API key. And since no one wants to enter their 32-digit API Key into their mobile device, this newest version of the app allows you to enter your API key on the web (meaning you can copy-and-paste on your desktop machine) then get a link that will allow your mobile device to open the app with those credentials already entered. I highly recommend using that API Shortcut tool before diving into the app.

I created the app for a few reasons:

  • As with the beacon parser, the main reason was because I wished a tool like this existed and figured if I was going to make it for myself, I may as well let other people use it too.
  • I have a web development background, and wanted to learn more about developing for Mobile Apps. I’ll admit on this front, I cheated a bit: rather than learning multiple native app languages (like Swift or C++), I used the Ionic Framework, which let me program the app using Angular (which fits with my JS/HTML background better than native languages), then use Cordova to turn it into a Mobile App. Still, I did get to learn a lot about mobile development in general, analytics options within mobile, and the release cycle for mobile development (I can’t just save a file and FTP it to my server), not to mention Angular 1/2 and typescript.
  • I needed a situation in which I could test out analytics tracking in various Single-Page App scenarios (yay Angular).
  • Because at heart, I am a developer. While I enjoy helping clients sort out governance and documentation issues, sometimes I just want to retreat to my basement and do some coding, for that straight-forward validation of seeing your code work in real-time. It’s good to keep those skills alive.

All in all, I learned so much. And I’ve already used the app quite a bit to keep track of my client’s Variable Maps (“what did we use event40 for? Oh yeah!”) However, I’m not a professional mobile developer, and this project was done entirely in my evenings/PTO as a learning exercise that happened to create a useable product. So please be forgiving of any thing in the app that is less-than-ideal; there is a reason I’m not charging for the app at all. I will continue working on improvements, particularly with an eye for performance (I’m looking at you, Android….) and I’m already aware of potential aesthetic issues on iPhone X. Please let me know of any other feedback or suggestions- I’d love to hear what you think!

P.S. Before anyone asks why I didn’t use the Adobe API OAuth2 Authentication, I thought about it, and may yet move to using that, but have concerns about how that works for marketing cloud AND non-marketing cloud logins. That, and the API documentation is… lacking… so I decided for now to stick with what I know. If anyone has experience with OAuth2 authentication and wants to discuss, please reach out. 

P.P.S. A special thanks to my beta testers!

Why (and why not) use a Data Layer?

What’s a Data Layer?

Tag Management Systems can get data a variety of ways. For instance in DTM you can use query string parameters, meta tags, or cookie values- but in general, data for most variables comes from one of two sources:

  • To really take advantage of a tag management system like DTM, I may choose to scrape the DOM. I’m gonna call this the MacGyver approach. This uses the existing HTML and styles on a site to For instance, DTM could use CSS selectors to pull the values out of a <div> with the class of “breadcrumb”, and end up with a value like “electronics>televisions>wide-screen”. This relies on my site having a reliable CSS structure, and there being elements on the page that include the values we need for reporting.
  • If I want even more flexibility, control and predictability, I may work with developers to create a data layer. They would create a JavaScript object, such as “universal_variable.pageName”, and give it a value based on our reporting needs, like “electronics | televisions | wide-screen > product list”. This gives greater control and flexibility for reporting, but requires developers to create JavaScript objects on the pages.

Conceptually speaking, a data layer is page-specific (but tool-agnostic) metadata that describes the page and the actions a user may take on it. Practically speaking, a data layer typically consists of a JavaScript object that contains all of the values we’d want to report on for a given page or user.

Data layers are important because they save developers time by allowing them to abstract out the metadata into a tool-agnostic syntax that a TMS like DTM can then ingest and set as data elements. Whereas once I would have told IT “please set s.prop5 and s.eVar5 to the search term on a search results page, and set s.events to event20” now I can just say “please put the search term in a javascript object such as digitalData.page.onsiteSearchTerm and tell me what object it is.” Then the TMS administrators could easily map that to the right variables from there.

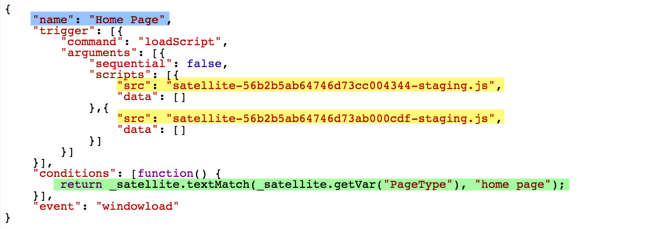
You can see an example data layer if you’d like, or you can pull open a developer console for this very blog and look at the object “digitalDataDDT” to see the data layer that is automatically created from Search Discovery’s wordpress plugin.

Why a Data Layer?

My friends at 33 Sticks also have a great blog post on the subject, but I’ll list out some of the reasons I prefer clients to use a Data Layer. To me, it’s an upfront investment for a scalable, easily maintained implementation going forward. It does mean more work upfront- you have to first design the data layer to make sure it covers your reporting requirements, then you’ll need developers to add that to your site. But beyond those upfront tasks, configuration in your TMS will be much simpler, and it will save you many hours of CSS guess work and DOM scraping, and it may prevent broken reporting down the line.

    Upfront LOE Maintenance LOE
Route Amount of Control Dev Analytics Dev Analytics
Old fashioned “page on code” Medium Heavy Heavy Heavy Heavy
DTM + “Macgyver” Low Minimal Heavy Minimal Heavy
DTM + Data Layer High Heavy Medium Minimal Minimal

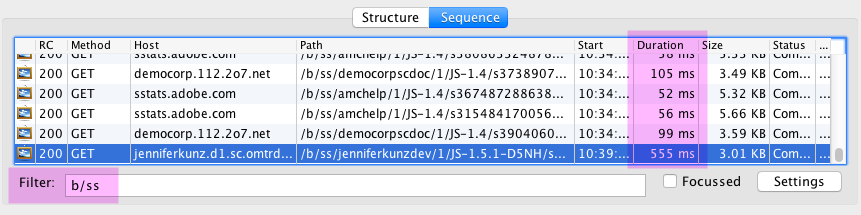
Another potential benefit to a Data Layer is that more and more supplementary tools know how to use them now. For instance, Observepoint’s site scanning tool can now return data on not just your Analytics and Marketing beacons, but on your Data Layer as well. And one of my favorite debugging tools, Dataslayer, can return both your beacons and your data layer to your console, so if something is breaking down, you can tell if it’s a data layer issue or a TMS issue.

Ask Yourself

Below are some questions to ask yourself when considering using a data layer:

How often does the code on the site change? If the DOM/HTML of the site changes frequently, you don’t want to rely on CSS selectors. I’ve had many clients have reports randomly break, and after much debugging we realized the problem was the developers changed the code without knowing it would affect analytics. It’s easier to tell developers to put a data layer object on a page then leave it alone, than it is to tell them to not change their HTML/CSS.

How CSS-savvy is your TMS team? If you have someone on your team who is comfortable navigating a DOM using CSS, then you may be able to get away without a data layer a little more easily… but plan on that CSS-savvy resource spending a lot of time in your TMS.  I’ll admit, I enjoy DOM-scraping, and have spent a LOT of time doing it. But I recognize that while it seems like a simple short-term fix, it rarely simplifies things in the long run.

How many pages/page types are on the site? A very complicated site is hard to manage through CSS- you have to familiarize yourself with the DOM of every page type.

How are CSS styles laid out? Are they clean, systematic, and fairly permanent? Clearly, the cleaner the DOM, the easier it is to scrape it.

How often are new pages or new site functionality released? Sites that role out new microsites or site functionality frequently would need a CSS-savvy person setting up their DTM for every change. Alternatively, relying on a data layer requires a data-layer-savvy developer on any new pages/site/functionality. It is often easier to write a solid Data Layer tech spec for developers to reference for projects going forward than to figure out CSS selectors for every new site/page/functionality.

How much link-tracking/post-page-load tracking do you have on your site? If you do need to track a lot of user actions beyond just page loads, involving IT to make sure you are tracking the right things (instead of trying to scrape things out of the HTML) can be extremely valuable. See my post on ways to get around relying on CSS for event-based rules for more info on options.

What is the turn-around time for the developers? Many clients move to DTM specifically because they can’t work easily within their dev team to set up analytics. A development-driven data layer may take many months to set up, stage, QA, and publish. Then if changes are needed, the process starts again. It may be worth going through the lengthy process initially, but if changes are frequently needed in this implementation, you may find yourself relying more on the DOM.

Are there other analytics/marketing tag vendors that may use a data layer? You may be able to hit two birds with one stone by creating a data layer that multiple tools can use.

Have you previously used another tag management system? Often, a data layer set up for a different tool can be used by DTM. Similarly, if the client ever moves away from DTM, their data layer can travel with them.

Does the site have jQuery? The jQuery library has many methods that help with CSS selectors (such as .parent, .child, .closest, .is, .closest…). A CSS-selector-based implementation may be more difficult without jQuery or a similar javascript library.

Who should create my Data Layer?

Ideally, your data layer should be created by your IT/developers… or at bare minimum, developers should be heavily involved. They may be able to hook into existing data in your CMS (for instance, if you use Adobe Experience Manager you can use the Context Hub as the basis for your data layer), or they may already have ideas for how they want to deploy. Your data layer should not be specific to just your Analytics solution; it should be seen as the basis of all things having to do with “data” on your site.

Yet frequently, for lack of IT investment, the analytics team will end up defining the data layer and dictating it to IT. These days, that’s what most Tech Specs consist of: instructions to developers on how to build a data layer. Usually, external documentation on data layers (like from consulting agencies) will be based on the W3C standard.

The W3C (with a task force including folks from Adobe, Ensighten, Microsoft, IBM…) has introduced a tool-agnostic data layer standard that can be used by many tools and vendors. The specifications for this can be found on the W3C site, and many resources exist already with examples. Adobe Consulting often proposes using the W3C as a starting point, if you don’t have any other plans. However, in my experience, generally that W3C is just a starting point. Some people don’t like the way the W3C is designed and most everyone needs to add on to it. For example, folks might ask:

  • why is “onsiteSearchTerms” part of digitalData.page? Can I put it instead in something I made up, like digitalData.search?
  • I want to track “planType”- the W3C didn’t plan for that, so can I just put it somewhere logical like digitalData.transaction?
  • I don’t need “digitalData.product” to be in an array- can I just make that a simple object.

The answer is: yes. You can tweak that standard to your heart’s delight. Just please, PLEASE, document it, and be aware that some tools will be built with the official standard in mind.

The Phased Approach

Many folks adopt a TMS specifically because they don’t want to have to go through IT release cycles to make changes to their implementation. You can still use a TMS to get a lot of what you need for reporting without a data layer and without a ton of CSS work. It may be worthwhile to put a “bare minimum” TMS deployment on your site to start getting the out of the box reports and any reports that don’t require a data layer (like something based on a plugin such as getTimeParting), then to fill in the data layer as you are able. I’d be wary though, because sometimes once that “bare minimum” reporting is in place, it can be easy to be complacent and lose some of the urgency behind getting a thorough solution implemented correctly from the start.

Conclusion

I fully understand that a properly designed data layer is a lot of work, but in my experience, there is going to be a lot of effort with or without a data layer- you can choose for that effort to be upfront in the planning and initial implementation, or you can plan on more longterm maintenance.

Should I have one DTM property, or many?

It’s common for a company in DTM to have multiple sites/groups/regions they want to deploy DTM on. One of the more important decisions you can make, early on, is whether to keep those different sites as separate properties, or keep them in a single DTM property. I know future iterations of the DTM tool will make up for some of the current issues we run up against when using multiple properties, but for now my advice is to keep as few properties as possible- it’s so much easier to maintain.

Note: Your properties in DTM are NOT related to your Adobe Analytics login companies or Report Suites- one property can go to many report suites (with custom logic in the s_code) or many properties can feed into the same report suite. So instead, you should consider the following:

How similar are the implementations?

Will the sites all have the same source for data, like a data layer, or CSS selectors? Do they use the same general analytics variable map (eg, “eVar15 is always search terms”)? Will they generally use the same third party tags? Do they all use Adobe Target or other DTM tools?

If your sites are similar and you want to keep separate properties, you can in theory set up one property and get it configured just right, then copy your rules and data elements over to all the other properties. But be warned: after rules are copied, if you need to update that rule, you must update all its copies too. To be honest, this can be beastly to maintain. I’ve seen it work, but only if folks use documentation to note what changes have happened where.
Imagine you want to add a new variable to your Search Results page, and you have 6 properties that have similar Search Results rules- you’d need to make that change in all 6 properties, and approve and publish in 6 places.
If, however, of your 6 sites, only 3 have a search results page, and all of them are pulling the search term out of a different query string parameter- then you’re going to be maintaining 6 separate rules anyways, and there is no benefit to keeping one property.

Another big consideration are the tools for each site. Tools in DTM are generally intended to be deployed on ALL pages using that DTM property- meaning you can’t turn on Target or the Marketing Cloud service for just one portion of a property. For Adobe Analytics, you can suppress the tool on certain pages, but in general, plan on Tools in DTM running on every page, without being able to suppress them for certain pages.

How similar are the publication timelines?

Will one site go live with the Analytics tool sooner than another? Does another site have a lengthy QA process?  Would it be ok to publish changes in DTM that will push out to all sites at once?

If Site B will have their old Analytics implementation removed from their site and ready for DTM to take over in June, and Site B won’t be ready until August, then you’d need to plan things very carefully in DTM. If the plan to transition to DTM really varies between your sites, then you may want to keep separate properties, at least for now. Perhaps in the future you could merge them back together.

Who will be doing the DTM work for each site?

Will the person implementing/administering DTM for one site be the same as for another site? Are you concerned about someone adding third party tags for site B having access to rules that could apply to site A? 

Within a company, you can use groups to restrict Users to certain properties. So you could say “Joe should only have access to Site B” if Site B is its own property.

Within a property, you can use groups to restrict Users to certain tools (for instance, you can give someone access to Third Party Tags but not to Adobe Analytics). You cannot, however, restrict certain rules- you can’t say “Joe can edit the homepage rule, but not purchase confirmation”.

On a side note, you can not restrict Admin access- if someone needs to make changes to tools, manage users, or view embed codes, that someone will have admin access for your whole company. So you can’t say “Joe should have access to the embed options for Site A but not Site B”.

Conclusion

If your sites are at all similar in their implementation, I think it’s worth it to try to make a single property work, but I definitely understand there are situations in which you must keep separate properties. Hopefully this post will help you decide on the best possible arrangement for your company.

What the DTM “top down” approach means for your page performance

Any javascript framework, including all Tag Management Systems like DTM, have the potential to ADD more javascript weight to your page. But if you approach things the right way, this javascript weight  and its effect on your page performance can by mitigated by using DTM to optimize how your tools and tags are delivered. In a partner post, I’ll be talking about how to get the most out of DTM as far as Third Party Tags go, but I think one key concept is worth discussing explicitly.
You may have heard DTM be referred to as a “Top Down” TMS. For instance, this appears in some of the marketing slide decks:
topdown

While yes, it’s worth discussing this as a holistic approach to your digital analytics, it actually has a very real effect on how you set your rules up and how that affects page performance. That’s what I hope to discuss in this post.

In a different TMS, or even in DTM if I haven’t changed my mindset yet, I may be tempted to do something like this:

down-upRules

Where I have differing rules for different scopes as well as for different tags (we’re pretending here that “Wuggly” is a Third Party Marketing Pixel vendor).

DTM does what it can to defer code or make it non-blocking, but there are parts of the DTM library which will run as syncronous code on all pages. Some of that is because of the way the code needs to work- the Marketing Cloud ID service must run before the other Adobe tools; older Target mbox code versions need to run syncronously at top of page. But there is also the code in the library that serves as a map for when and how all of the deferred code should run. For instance, my library may include the following:

downUpCode

All of this logic exists to say “if the current pageType is “home page”, run this code non-sequentially”.  The name, conditions and event code for each rule run on each page as part of the overall library- these serve as a map for DTM to know which code must run, and which code it can ignore and not run.
You’ll notice the code for the two rules is completely identical, except for the rule name (in blue) and the source of the external script (in yellow). Most importantly, the conditions (in green) are identical. Whereas if they shared a rule, we might see the exact same thing as above accomplished with half as much code:

topDownCode

I now have ONE rule, which would be used for ALL logic that should run on the Home Page. The part of the library that runs on every page to check against conditions only has to check if the “pageType” is “home page” once, rather than twice. And DTM still loads the two scripts as separate non-sequential javascript. This doesn’t look like a major change, but when viewed across a whole implementation, where there may be dozens of rules, it can make a big difference in how many rules and conditions DTM must check on every page.

In the DTM interface, this would look like this:
topDownRules

If I want to know which rules contain my “Wuggly” codes, I can use the  “Tag Name” filter in the rules list, which will show me all rules that have a third party tag that includes “Wuggly”:
topDownFilter

This is filtering based on the Tag Name specified when you add the tag code:
topDownTagName

Using this approach, where your rules are based on their scope (or condition) and contain all logic- Analytics, Target, third party- that applies to that scope can not only lighten your library weight, but it can also keep your DTM implementation organized and scalable, but it may also require a change of mindset for how DTM is organized- if someone else needed to deploy a tag on Product Detail Pages, they wouldn’t need to create a rule, but rather, they could see a “Product Detail Page” rule already exists with the scope they need, and they need only add the third party tag.

There is one potential downside to consider, though- the approval and publication flow is based on Rules in their entirety. You can’t say “publish my changes to the analytics portion of this tool, but not to the third party tag section”. Still, if you are aware of this as you plan the publication of new features, this potential drawback rarely overrides the advantages.

Using Charles Proxy for Analytics

Charles Proxy is a packet-sniffing tool often used by web analysts and developers to debug beacons being sent to Adobe. I find it has some advantages over other tools, even over the Adobe Debugger, because it isn’t looking at your javascript or your “s” object on your DOM, and isn’t tied to a specific browser window or page, but rather it looks at what traffic is actually being sent (and hopefully, successfully received) by Adobe, regardless of where or how it is sent.

charlesFullBeacon

This shows all the parameters (or variables) in your analytics beacon. Some very nice person put up a cheat sheet of how those parameters map to variables or are used in processing and reporting.

On top of looking at Analytics Beacons, I often use it to do the following:

  • Examine which DTM files are loading, and in what order.
  • Check that calls to other Adobe tools (Marketing Cloud ID Service, Target, Audience Manager) are happening in the right order, and with the right parameters.
  • Route traffic from a mobile device through my desktop to see analytics beacons from that device (see instructions below).
  • Use Tools>Map Local to use a file on my machine to replace one of my client’s pages in my browser (for instance, I could save the source of a client’s page, tweak it for my needs, save it to my desktop, and then use Charles Map Local to look at how that page would behave in place of the real one). This makes it easy to see how a client’s page acts when a DTM library is placed on it, or if certain code is removed.
  • Use Tools>Map Remote to replace a file on the client’s site with a file from elsewhere on the internet. Often, this is to swap one DTM library out for another. Sometimes, I do this just to purposefully break a file- if I’m curious how a site would behave without jQuery, I might use map local to say “replace the jQuery file with a file at blank.js” (which doesn’t actually exist, so it effectively just says “don’t load the jQuery file). I did this often enough, and got sick of even seeing 404 errors, I created a blank file specifically for replacing other files.
  • Get the full URL of a POST beacon, so I can use my beacon parser tool to split it out.
  • Save a session of Analytics traffic so you can send it to peers.
  • View the Headers and Cookies attached to a given beacon (at the bottom of a beacon, where you are viewing your params, switch from Query Params to either “Headers” or “Cookies”):
    charlesHeaders

Charles is free if you’re ok with seeing a long splash screen and having sessions limited in length; it’s 50 dollars for a personal license if you want no splash screen and unlimited session length (I bought mine many years and many updates ago, it was worth every penny).

Charles Proxy and I have a bit of a love-hate relationship. It is pretty much ALWAYS open on my machine. It makes many aspects of my job so much easier. But sometimes, it just… doesn’t work. Many folks use the Tools>Rewrite capability to replace just certain code on the page, but it rarely works for me. And getting all the certification set up to accurately track SSL traffic is tricky. So, below is my guide for all the steps I follow when setting up Charles on a new machine to make it ideal for the type of tasks I test to do:

Install it

I prefer the Beta version since it happens to work better with my certificates and such, but for most folks the normal download should do just fine.  After you install it, if you use Firefox, you’ll also want to download the Firefox extension- the easiest way is to go to Charles>Help>Install Mozilla Firefox Add-on. This is not needed for Chrome or the other common modern browsers.

Filter it

Charles captures ALL traffic sent from your machine to anywhere on the internet. It can be… comprehensive. I quickly find it to be too much information, and I use the “Include” tab in Proxy>Recording Settings to tell Charles to only show things relevant to my job. Below are the common ones (asterisks are wildcards):

  • “assets.adobedtm.com” will show all Akamai-hosted DTM files. (If you self-host, you’ll want to add that URL up to the folder that contains your scripts- in other words, stop just before it says “/satelliteLib-“. That way you see ALL DTM files, like your s_code file, not just your main library)
  • “*demdex.net” shows Audience Manager and Marketing Cloud ID calls (fun fact: the Marketing Cloud ID service uses technology gained from Adobe’s acquisition of Demdex).
  • “*.tt.omtrdc.net” shows Target calls
  • Whatever domain you capture your analytics tracking on. For instance, on this site, my non-secure beacons are sent to “jenniferkunz.d1.sc.omtrdc.net”. Make sure you include both the secure and non-secure domains. If in doubt, you may be able to check this by seeing what your s.trackingServer and s.trackingServerSecure variables are set to in your s_code.
  • Because I have many Analytics clients, I also include all the common domains for analytics tracking, but you may not want to do this because you’ll catch many beacons not relevant to your implementation:
    • “*.2o7.net” for non-RDC, non-CNAME implementations
    • “*.omtrdc.net” for RDC implementations
    • “*metric*” as the domain and “*/b/ss*” as the path, to capture a vast majority of CNAME implementations.

charlesInclude

Use “Sequence” Mode

Most folks use “Structure” mode for viewing beacons, where a panel on the left will show all traffic, broken down by domain:

charlesStructureMode

I used this for years before realizing how much more I like sequence mode, which offers a few benefits:

  • It shows things in the order that they occur (making it easy to spot things like “uh-oh, the marketing cloud ID service hadn’t responded by the time my beacon fired”
  • You don’t have to know the root domain of your beacons off the top of your head. Secure and non-secure beacons are shown alongside each other.
  • It makes it very easy to filter. I often filter by “b/ss” to show only Analytics beacons, but you could also filter by “v0” to see only beacons that set the s.campaign variable, or by “landing” to show only beacons that had a pageName including “landing”.
    charlesSequence

Get it working with SSL

By default, Charles can’t read traffic from secure sources- or it can only show them with encrypted values (generally useless for debugging). There is information on the Charles site about setting up SSL tracking, but it can be hard to know what it means for you.

First, you need to set up a Root Certificate on your machine, giving Charles control over how your machine handles SSL Certificates. Go to Help>SSL Proxying>Install Charles Root Certificate. Follow the prompts from your operating system, but keep a careful eye out for two settings:

  • From the Charles site (specific to windows): “The certificate must be imported into the “Trusted Root Certification Authorities” certificate store, so override the automatic certificate store selection.”
  • Ensure the certificate is set to “Always trust” (if you miss this setting first time around, and you’re on a mac, you can change it later by opening your keychain.

If you have Firefox, you’ll also need to install the certificate through Firefox. If you’ve installed the Charles extension, then within Firefox you should be able to go to Tools>Charles Proxy>Install Charles Root Certificate.  When given the option, click “Trust this CA to identify websites”.

All of this has gotten Charles primed to listen for SSL traffic, but you still need to tell Charles which specific sites it can listen to, by going to Proxy>SSL Proxying Settings>SSL Proxying and entering the domains of your SSL analytics traffic. I tend to have this list pretty closely match by list of overall traffic filters, mentioned above (eg: “*2o7.net”, “*omtrdc.net”, “assets.adobedtm.com”, and “smetrics.*.com”). (Update 2023: adobedc.net or “/ee/” seem like good filters for Adobe Experience Platform traffic).

Use it for Mobile Devices

If you want to route your traffic from a mobile device through Charles, it’s fairly simple. Below are instructions for an iOS device… sorry Android users, you’ll need to google to find similar instructions). Your mobile device and your desktop will need to be on the same network (ie, same WiFi). If your desktop is on VPN, your phone will need to be too.

First, if you will be looking at secure traffic, you’ll need to install the Charles certificate to your device. On your device, go to http://www.charlesproxy.com/getssl and follow the prompt. Pretty easy.

Next, get your local IP address (hint: this is different from your overall IP address, and specific to within your network). Charles makes this easy- in Charles, go to Help>Local IP Address.  You may want to jot this down and close this window, because when you get things working, Charles will want to pop up another window you need to pay attention to.

Lastly, on your phone, open up your WiFi settings and scroll to the bottom. Under HTTP Proxy, select “Manual”, then under Server, enter the Local IP address you noted above. Under Port, enter “8888”. Then click Renew Lease. (2023 update- I don’t believe Renew Lease is needed anymore, or even an option).

charlesMobile

[update- September 2017): If you still have issues with SSL traffic and get a “SSLHandshake: Received fatal alert: unknown_ca” error, you may need to go into your device’s settings- Settings > General > About > Certificate Trust Testings – and make sure the Charles Proxy Custom Root Certificate is marked as trusted.

Don’t forget to switch this back to “off” when done. 

Now move out to your browser and do a simple test to see if traffic gets sent and shows in Charles. The first bit of traffic should prompt a Charles warning on your machine, asking you to Allow this traffic.  If you miss this setting the first time around, you can tweak it under Charles>Tools>Access Control Settings.

Troubleshooting

If after all of this, it isn’t working right, here’s a few things to try:

  • If you are on VPN, and Charles isn’t cooperating, try switching the order you do things in: perhaps by opening your VPN first, THEN Charles, or the other way around. Experiment.
  • If Charles works in one browser and not in another, check your Proxy menu: are you set to capture traffic data both on your OS (and therefore Chrome), as well as Firefox?
  • If Charles is interfering with things like your email server, check out your Bypass Proxy settings.


Beacon Parser again!

Some new updates in the beacon parser:

  • Fixed a bug that prevented heartbeat beacons from tracking
  • Made it possible to remove beacon columns
  • Added API functionality, which can pull down your report suite IDs and custom variable names using the Adobe Admin API.

A huge thanks to this summit lab session for hints on using JSON/AJAX on the API.

Let me know how it works for you!