
The standard Omniture Campaign reporting offering, based solely on a query string/tracking code pair, is pretty solid: campaign reports and all the possible classifications, paid/natural search detection and reporting, and marketing channel reporting, managed from right there in the SiteCatalyst admin console. But over time we’ve found some tips and tricks that can maximize the value of your campaign tracking efforts.
All of these tips rely on granular but intuitive tracking codes, which your s_code grabs automatically out of a query string parameter. If you do not have a well-founded system for setting your tracking codes, then that should be your focus before expanding your campaign reports. Assuming you have your marketing efforts well identified, here are some ideas to implement:
TIP #1: CUSTOM CAMPAIGN CLICK-THROUGHS
Out of the box, SiteCatalyst has the “click-throughs” metric in any campaign report, which is essentially the same as “instances” in any other conversion report. The problem is that you cannot pull your campaign click-throughs as a metric into non-campaign reports- for instance, into a campaign landing pages report, or a breakdown for any other eVar that lasts between sessions or is set on a campaign landing page. A common need is to see Campaign Click-throughs in a conversion funnel:

For this reason, many of my past clients have implemented a “custom” campaign clickthrough event, which they then have full control over.
The code for this is simple. I recommend using the Append List plugin (s.apl) to ensure the custom event does not overwrite any other events on the page. In this example, event3 has been set aside and named “Custom Campaign Click-throughs”, and the append list plugin code is included in the plugins section:
s.campaign=s.getQueryParam(‘cid’);
if(s.campaign){s.events=s.apl(s.events,’event3′,’,’,1)};
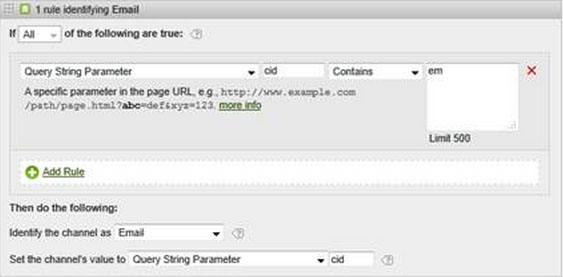
TIP #2: GRANULAR, CLASSIFIED TRACKING CODES WITH A MARKETING CHANNEL PREFIX
This isn’t so much a tip as it is a best practice. While generally the recommendation has always been to just have a granular tracking code and all information could be uploaded afterwards using SAINT classifications, you might save yourself a lot of headache by including a marketing channel identifier in each tracking code. SAINT is a wonderful tool, but classifications cannot be used to define the (fantastic) Marketing Channel reports. So instead of relying solely on classifications to specify that tracking code “2364FS” was an email campaign, turn the tracking code into “em-2364FS”. Not only does this make it easy to filter your tracking codes report, but you can also then set up a Marketing Channel processing rule that specifies that any tracking code that beings with “em” should go into the “Email Campaign” channel:
What? You haven’t set up your Marketing Channel reports? Well, get on it! It doesn’t take long, this blog post will wait.
TIP #3: CAMPAIGN LANDING PAGE PATHING
I’ll admit, of all the tips listed here, this is my favorite. The standard pathing reports are wonderful but not a lot of help for marketers. Campaign Landing Page Pathing uses a pathing prop to show how campaigns play into paths that users take through the site. Any time the s.campaign variable is set, it is appended to the pageName and put into a prop that has pathing enabled (“Promo Landing Page: em1435”). For all other pages, just the pageName is set:
if(s.campaign){s.prop11=s.pageName+": "+s.campaign}
 else{s.prop11=s.pageName};
As a freestanding page views report, I’ll admit the data is nearly useless- a jumble of campaigns and pageNames. BUT, once viewed in a pathing report, you can now see for each campaign and landing page, what next steps a user took. You might see paths that look like this:
Landing Page A: em12543 > Page B > Page C > Exit
You can now create Fall-Out reports based on particular campaigns. You could also see a next page flow report like this, showing the full range of possible paths users are taking from a campaign landing page:

Is your campaign taking your users somewhere you didn’t expect? Is that something you can capitalize on?
You can hit two birds with one stone and use the same logic to also set a “Campaign Landing Page” eVar, if you want to see how individual landing pages contribute to conversion (see the final code of this post for an example).
Please note, this kind of trick becomes less necessary in SiteCatalyst 15 because you can now segment your pathing reports based on campaigns, but it would still be useful if you wanted to compare campaigns to each other quickly without setting up a segment for each.
TIP #4: CAMPAIGN CROSS-VISIT PARTICIPATION
Campaign Cross-visit Participation, also known as “campaign stacking”, has been well covered elsewhere on the web, so I won’t go into too much detail, but no campaign “tips” post would be complete without it. The Marketing Channel reports can show you First and Last Touch, but not much in between. Using the crossVisitParticipation plugin, you can see all of the different campaigns a certain user touched before accomplishing a certain event. Using this plugin for my tracking codes, I could do a report filter for one specific tracking code and see how other tracking codes contributed to it leading to a conversion:

The code looks like this:
s.eVar26=s.crossVisitParticipation(s.campaign,'s_cpmcvp','90','5','>','')
While this plugin is wonderful for campaigns, the possible uses of it are limitless- any time you want to see the “path” a user takes through the values of any of your variables, and how that path affects conversion.
ALTOGETHER NOW
If I were to use all of the above tips and standard best practices, my final code might look something like this:
/* Campaign tracking */
 if (s.getQueryParam('cid'))
 {s.campaign=s.getQueryParam('cid');                                         //capture campaign ID
 s.events=s.apl(s.events,'event7',',',1)   ;                                 //custom Campaign Clickthroughs
 s.eVar26=s.crossVisitParticipation(s.campaign,'s_cpmcvp','90','5','>','');  //campaign "stacking"
 s.eVar24=s.prop11=s.pageName+" : "+s.campaign ;                             //campaign landing page eVar and pathing prop
 s.eVar25=s.campaign=s.getValOnce(s.campaign, 'cid_cookie', 0);              //campaign eVar with original allocation
 }else{s.prop11=s.pageName}  ;                                               //campaign landing page pathing
The final result is a set of marketing reports that paint a fuller picture of campaign behavior on your site.
Code for the Append List and GetValOnceplugin can be found in the Help section of SiteCatalyst, under Product Documentation > Implementation > Plugins. Contact your friendly implementation consultant if you need information about implementing Cross-Visit Participation.